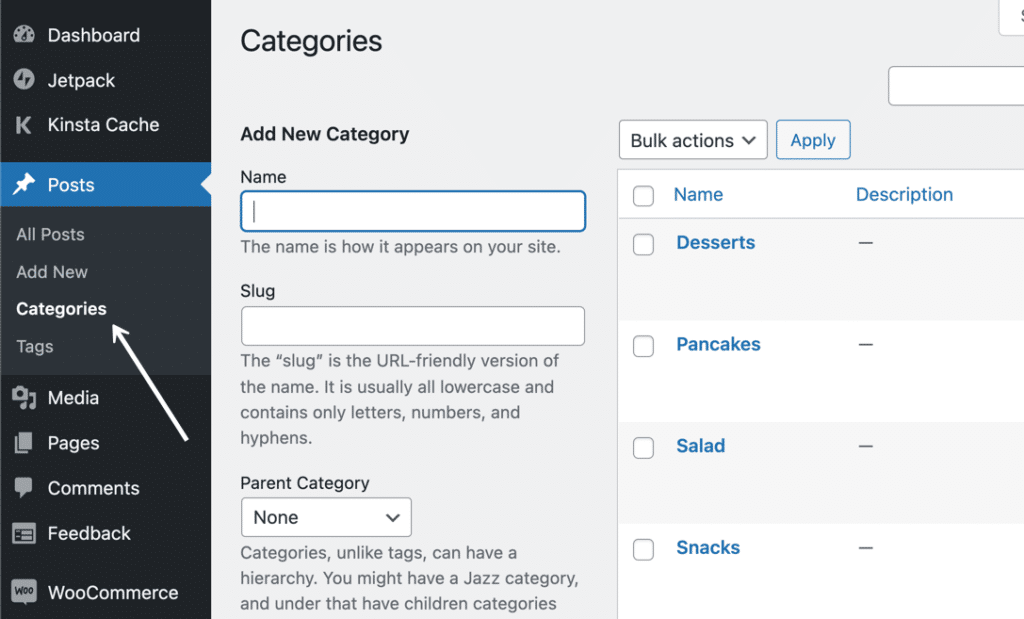
To delete a category in WordPress, head to the Posts – Categories section in your dashboard. Locate the category you want to remove. Hover over it and click on delete. This action initiates the deletion process. Remember, once you confirm, the category will be permanently removed. Posts from the deleted category will be reassigned to the default ‘Uncategorized’ option. This process ensures your content stays organized and easily accessible.
Access WordPress Dashboard
To delete a category in WordPress, begin by logging into your site and accessing the WordPress Dashboard. Once you’re in the Dashboard, head over to the Posts section. Within the Posts section, you’ll find the Categories option. This is where you can manage all your existing categories.
Scroll through the list of categories until you locate the one you wish to delete. Hover over the category, and an option to delete it will appear. Click on the delete option to initiate the deletion process. Remember, once a category is deleted, it can’t be restored.
It’s essential to note that if you delete a category in WordPress it won’t remove the posts within it. Instead, those posts will be automatically reassigned to the default category, usually labeled as ‘Uncategorized’.
Navigate to Posts – Categories

Head to the ‘Posts – Categories’ section in your WordPress dashboard to manage and delete categories efficiently. This section allows you to oversee all your categories in one place.
By hovering over the category you wish to delete, you can easily access the option to remove it. Remember that the default Uncategorized category can’t be deleted.
If you delete a category in WordPress it is a useful way to streamline your content organization on your website. It helps in ensuring that your posts are well-categorized and easy to navigate for your visitors.
When you delete a category, the posts that were originally assigned to it will automatically be moved to the default Uncategorized category. This process maintains the continuity of your content while allowing you to make necessary adjustments to your category structure.
Take advantage of the Posts – Categories section to keep your WordPress site organized and user-friendly.
Select Category to Delete
When deciding which category to delete in WordPress, locate the specific category you wish to remove from the list displayed under the Categories section in the Posts tab. To begin, access the Posts section on your WordPress dashboard.
Within the Posts tab, you’ll find the Categories option where you can manage all your categories. Scroll through the list until you identify the category you want to delete. Hover over the category name, and you’ll see the option to delete it. Click on the Delete option to proceed with removing the category.
Remember that the default Uncategorized category can’t be deleted in WordPress. If you attempt to delete a category, any posts assigned to that category will be automatically reassigned to the default Uncategorized category.
Choose ‘Delete’ From Bulk Actions
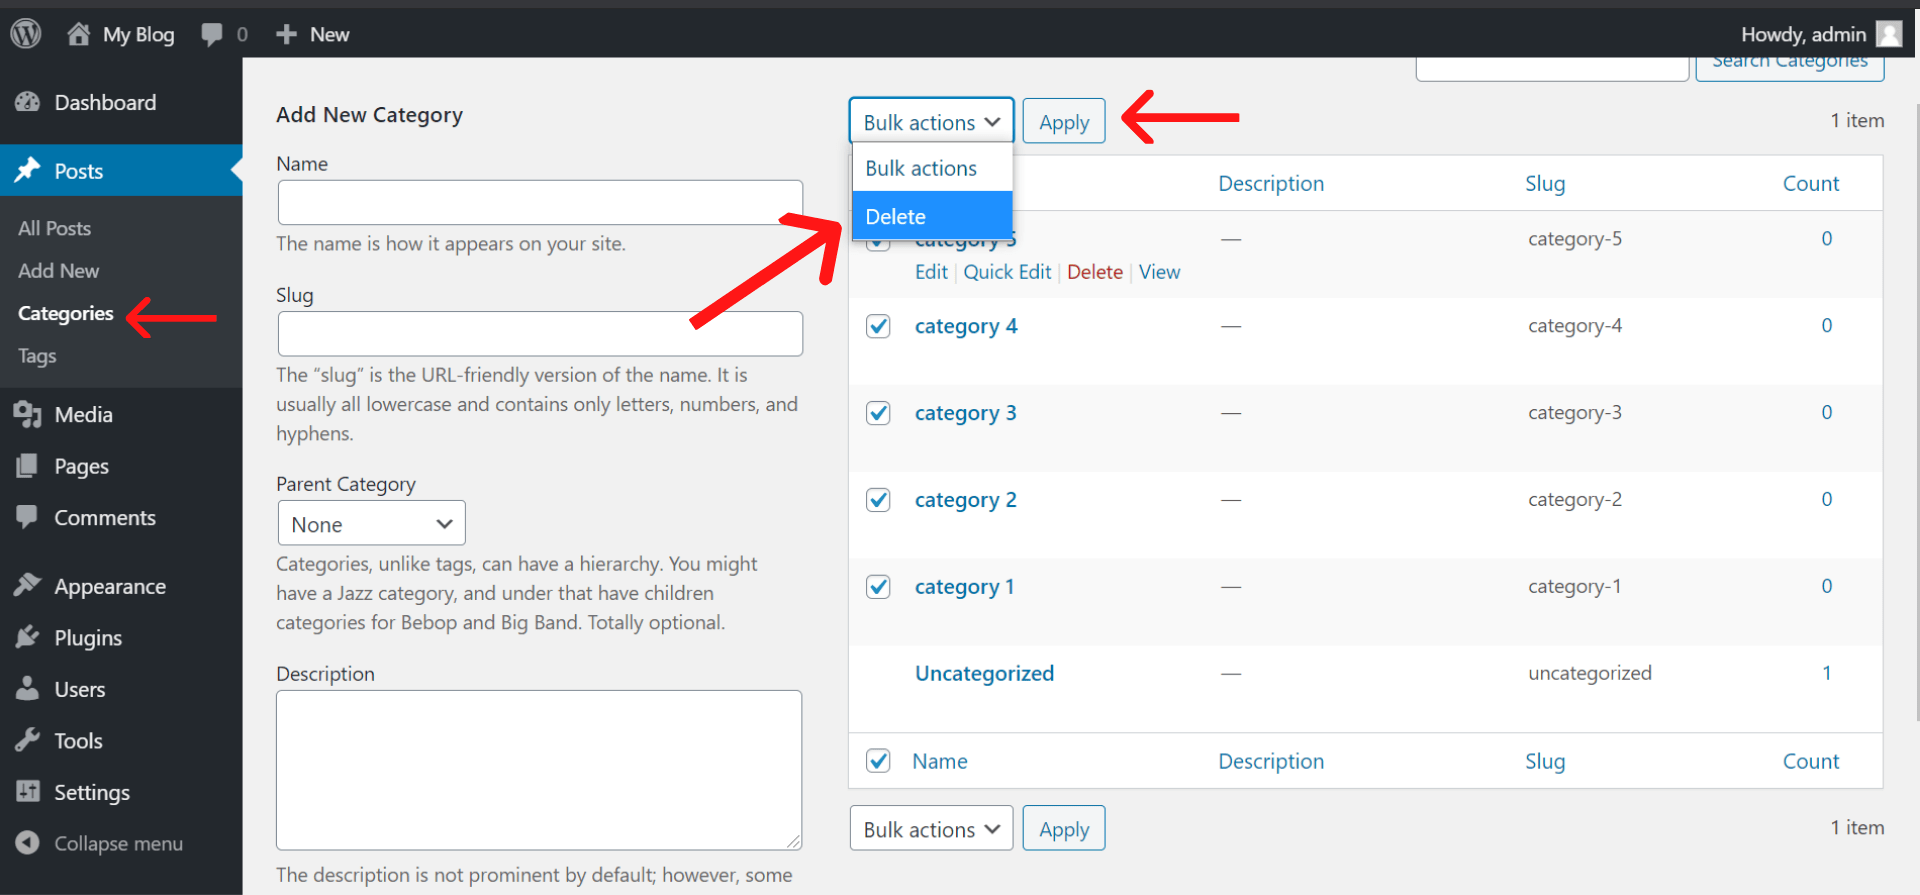
Navigate to the Posts – Categories section in your WordPress dashboard to access the Bulk Actions dropdown menu for deleting categories efficiently. Once you have selected the category you wish to delete, check the box next to it. Then, click on the ‘Bulk Actions’ dropdown menu and choose ‘Delete’. After selecting ‘Delete’, hit the ‘Apply’ button to proceed with the deletion process.

By utilizing the Bulk Actions feature, you can delete multiple categories simultaneously, saving you time and effort.
When you choose to delete a category using Bulk Actions, remember that this action is irreversible. Any posts previously assigned to the deleted category will be automatically moved to the default ‘Uncategorized’ category.
This method offers a convenient way to clean up your category list and reorganize your posts without having to delete each category individually. Streamline your category management by leveraging the Bulk Actions option for efficient category deletion in WordPress.
Confirm Deletion
To confirm the deletion of a category in WordPress, click on the ‘Apply’ button after selecting ‘Delete’ from the Bulk Actions dropdown menu.
Once you confirm the deletion, the category will be permanently removed from the category list. Remember, deleting a category doesn’t delete the posts within it; they’ll be reassigned to the default category automatically.
It’s crucial to understand that once a category is deleted, it can’t be restored in WordPress, so ensure that you no longer need it.
The removal of categories may have an impact on the organization and navigation of your website’s content. Be mindful of this before proceeding.
Deleted categories could affect the structure of your dynamic category pages, so make sure to review the changes and adjust as necessary after deletion.
Reassign Posts to Default Category
After deleting a category in WordPress, all posts previously assigned to it will be automatically reassigned to the default category. The default category acts as a safety net, ensuring posts have a designated category even if they were previously under the deleted category.
This reassignment is crucial for maintaining the organization of your content and preventing posts from being left uncategorized. By reassigning posts to the default category, you avoid a content management headache and keep your site structured.
Without this automatic process, posts could end up disorganized, making it harder for visitors to navigate your site effectively.
It’s important to note that reassigning posts to the default category doesn’t alter the content itself; it simply adjusts the way they’re categorized on your WordPress site. This seamless transition ensures that your posts remain accessible and correctly classified, contributing to a better user experience on your website.

Delete a Category in WordPress Final Thoughts
Congratulations on successfully deleting a category in WordPress! By following the simple steps outlined in this guide, you have decluttered your site and improved its organization.
Remember to reassign any posts to a default category to maintain a seamless user experience.
Keep up the good work in managing your WordPress site efficiently and effectively.